I love wireless chargers. The first time I used one was with my old Palm Pixi Smartphone, where I’d just place the Pixi on the angled charger which held it by a magnet. No muss, no fuss, just convenient charging. Flash forward a few years and I’m doing it again with Samsung Galaxy S6 Smartphone.
Now, you can buy the official Samsung Wireless Charger for $49.99 US, which is kinda steep.

Samsung Wireless Charging Pad
Or, you can buy any generic Qi-standard charging pad or a PMA-compatible charging pad for the Samsung S6. There are several available on Amazon.com, which run from $12 to $40 US. I purchased three different charging pads, which I’ll discuss below.
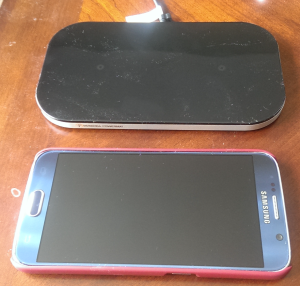
First, I bought the Duracell Powermat from Amazon.com for $9.99, because it was so drastically reduced in price from the $99 list. Now, this charging pad uses the PMA-standard, but that will still work with my Samsung S6. Below is a picture of my Samsung S6 next to the Duracell Charging Pad.
The Duracell charger is roughly the same size as my S6, but it is designed to charge two devices simultaneously. The picture below shows how you would position the S6 on the charger. The one bad thing about this charger, is that you need to hit the “sweet spot” when you place the S6 on it, otherwise it won’t charge. Also, this charger makes a strange tone sound when I place and remove the S6 from it. This can be an issue if you have the charging pad on a nightstand and you don’t want to disturb your sleeping spouse! But for $9.99, it was still a good deal for a wireless charging pad.

Duracell Powermat with Samsung S6
Next up, is the CHOE Stadium Wireless charging pad. I bought this from Amazon.com for $28 (list price $70). This charging pad has 3 coils, which supposedly makes it easier to make a charging connection (no worries about hitting the sweet spot).

CHOE Stadium Charging Pad
This charging pad is slightly smaller than the S6 in height, and it works flawlessly with making a charging connection. Below is a picture of my S6 on the CHOE charger. There’s a small blue light on the charger that turns on when my S6 is charging, and the charger is silent (no sounds when you connect or disconnect the S6).
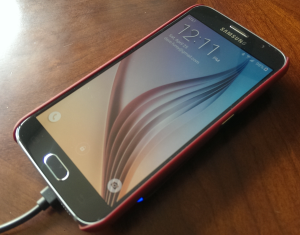
Samsung S6 charging on the CHOE Stadium Charging Pad
I use the CHOE Charging Pad on my home office desk to charge my S6 during the evenings and overnight.
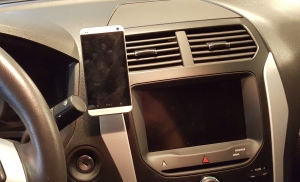
I also wanted to get a wireless charger for my Ford Explorer Car, so I bought the PowerBot from Amazon for $15.00 US. As you can see below, the PowerBot is a round pad roughly the same width as my S6.

PowerBot Charging Pad
What I like about the PowerBot, is that is lightweight and had a rubber ring around the top surface. This helps to keep my S6 “stuck” to the charger while I drive around in my car. The input to the charger is a standard USB port, so I connect it to a Qualcomm-compatible Quick Charge 12V Auto Lighter for power. Below is a picture of my S6 on the PowerBot Charger.

S6 on the PowerBot Charging Pad
The PowerBot has a green LED light that changes to Blue when the S6 is charging. Also, the PowerBot doesn’t make any sound or tones when you connect or disconnect the charging device.
I suppose my favorite of the three chargers is the PowerBot. I love the compactness, and I simply need to place the middle of the S6 on the PowerBot to initiate charging. In my car, I have the PowerBot resting on the passenger seat between the horizontal and vertical part of the seat.
One thing to note, is that the Duracell Powermat uses it’s own AC charger to power the charger. The CHOE and PowerBot chargers use a standard USB port, so they don’t come with an AC charger. In this case, you need to make sure you are supplying at least 2 Amps of power to the USB port otherwise the charger won’t work properly. In my case, I have a 5 port USB powered hub which outputs 5V at 2.4 Amps for each port.
Also, from the pictures you’ll see that I have a maroon colored case for my Samsung S6. Even with the case attached, all three chargers work fine to charge my S6.
Wireless charging is great, as it makes it easier for me since I don’t need to connect and disconnect USB cables. Also, it saves on the wear-and-tear of the USB port on my S6, which I certainly don’t want to break!


 Posted by zunetips


 I’ve been using an HTC One M7 phone for the last two years on the AT&T network, and I just loved it. The phone’s build quality was great, as well as the vibrant screen and fast CPU. The only thing I didn’t like about the HTC One M7 was the terrible camera, which always produced blurry pictures for me. But just like anything, after two years technology can become obsolete. In addition, the lithium ion battery in smartphone seem to lose their charging ability after the two year mark, and as such most people will upgrade to the next greatest thing.
 Some people love to “root” their phones, which allows them to access restricted areas of the Android OS and install special apps and possibly custom ROMs. I normally don’t like to mess with my phone, but I have rooted my last two phones for different reasons.

 It’s been know for the last several months that Amazon would be coming out with a new smartphone for the masses. Very little was know about it, but people speculated that it would be released in a similar fashion as the Kindle Fire Tablet. That is, it would be a well constructed device running Amazon’s custom version of the Android OS, and sold for a below-market-value price. The thought being, Amazon would make up for the low price by getting people to use more of it’s paid services.

You must be logged in to post a comment.